このチュートリアルでは、Googleの「関連する質問」セクションをスクレイピングするPythonスクリプトの作成方法を学習します。「関連する質問」には、検索クエリに関するよくある質問や貴重な情報が含まれています。
さっそく始めましょう!
Googleの「関連する質問」機能について
「関連する質問」(PAA)はGoogle SERP(検索エンジンの結果ページ)のセクションで、検索クエリに関連する質問の最新リストが掲載されています。

このセクションは、検索クエリに関連するトピックを深掘りするのに役立ちます。2015年頃に初めて導入されたPAAは、展開可能な一連の質問として検索結果に表示されます。質問をクリックすると展開され、関連するWebページからの簡単な回答と、ソースへのリンクが表示されます。
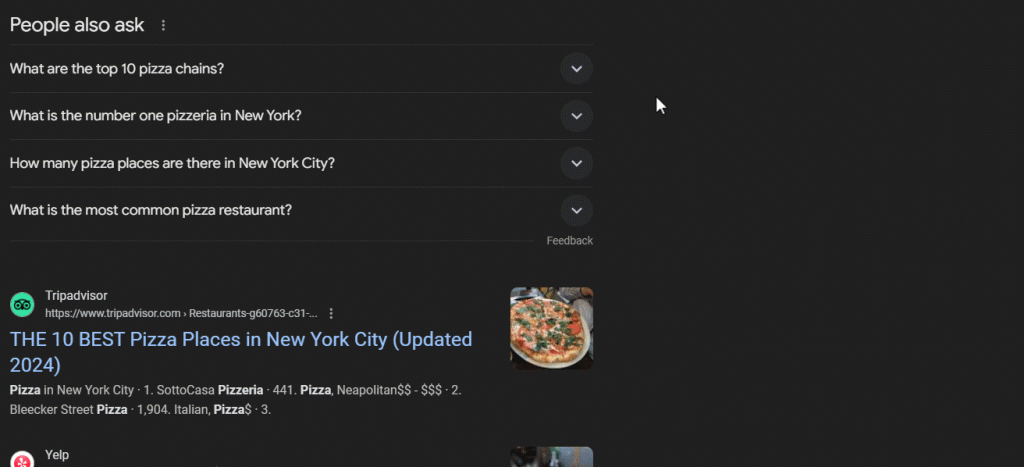
「関連する質問」セクションはユーザーの検索に基づいて頻繁に更新・調整され、最新かつ関連性の高い情報を提供しています。ドロップダウンを開くたびに、新しい質問が新たに読み込まれます。
Googleの「関連する質問」をスクレイピングする:手順ガイド
このガイドに従って、Google SERPから「関連する質問」をスクレイピングするPythonスクリプトの作成方法を学びましょう。
最終目標は、ページの「関連する質問」セクションの各質問に含まれるデータを取得することです。Googleのスクレイピングに興味がある場合は、SERPスクレイピングに関するチュートリアルに従ってください。
ステップ1:プロジェクトを準備する
始める前に、マシンにPython 3がインストールされていることを確認します。インストールされていない場合は、Python 3をダウンロードして実行し、インストールウィザードの指示に従います。
次に、仮想環境を使ってPythonプロジェクトのイニシャライズを行うために、以下のコマンドを使用します。
mkdir people-also-ask-scraper
cd people-also-ask-scraper
python -m venv env
people-also-ask-scraperディクショナリは、Python PAAスクレイパーのプロジェクトフォルダを表しています。
お好みのPython IDEにプロジェクトフォルダを読み込みます。PyCharm Community Editionか、Python拡張機能を入れたVisual Studio Codeがおすすめです。
プロジェクトフォルダにscraper.pyファイルを作成します。これは現在、空白のスクリプトですが、まもなくスクレイピングのロジックが組み込まれます。

IDEのターミナルで、仮想環境を有効にします。LinuxまたはmacOSでは、次のコマンドを実行してください。
./env/bin/activate
Windowsでは以下を実行してください。
env/Scripts/activate
これでスクレイパー向けのPython環境が整いました!
ステップ2:Seleniumをインストールする
Googleはユーザーの操作を必要とするプラットフォームです。また、有効なGoogle検索URLを作成することは容易ではありません。したがって、検索エンジンと連携するにはブラウザ内で作業するのが一番です。
言い換えれば、「関連する質問」セクションをスクレイピングするには、ブラウザ自動化ツールが必要です。この概念に馴染みがない方のために説明すると、ブラウザ自動化ツールは、制御可能なブラウザ内でWebページのレンダリングと操作を可能にするものです。Pythonで最高のオプションの1つはSeleniumです!
アクティブなPython仮想環境で以下のコマンドを実行してSeleniumをインストールします。
pip install selenium
selenium pipパッケージがプロジェクトの依存関係に追加されます。これには時間がかかる場合があるので、しばらくお待ちください。
このツールの使用方法の詳細については、SeleniumでのWebスクレイピングに関するガイドをご覧ください。
素晴らしい、これでGoogleのページをスクレイピングする準備が整いました!
ステップ3:Googleホームページに移動する
Seleniumをscraper.pyにインポートし、Chromeインスタンスをヘッドレスモードで制御するためにWebDriverオブジェクトを初期化します。
from selenium import webdriver
from selenium.webdriver.chrome.service import Service
from selenium.webdriver.chrome.options import Options

# to control a Chrome window in headless mode
options = Options()
options.add_argument("--headless") # comment it while developing

# initialize a web driver instance with the
# specified options
driver = webdriver.Chrome(
    service=Service(),
    options=options
)
上記のコードは、Chromeウィンドウをプログラムで制御するためのオブジェクトであるChrome WebDriverインスタンスを作成します。--headlessオプションは、Chromeがヘッドレスモードで実行されるように設定します。デバッグ目的で、その行にコメントを付けて、自動化されたスクリプトの動作をリアルタイムで観察できるようにします。
次に、get()メソッドを使用してGoogleホームページに接続します。
driver.get("https://google.com/")
スクリプトの最後に忘れずにドライバリソースを解放してください。
driver.quit()
すべてをまとめると、次のようになります。
from selenium import webdriver
from selenium.webdriver.chrome.service import Service
from selenium.webdriver.chrome.options import Options

# to control a Chrome window in headless mode
options = Options()
options.add_argument("--headless") # comment it while developing

# initialize a web driver instance with the
# specified options
driver = webdriver.Chrome(
    service=Service(),
    options=options
)

# connect to the Google home page
driver.get("https://google.com/")

# scraping logic...

# close the browser and free up the resources
driver.quit()
素晴らしい、これで動的Webサイトをスクレイピングする準備ができました!
ステップ 4:GDPR(一般データ保護規則)クッキーダイアログへの対処
注:EU(欧州連合)圏内にお住まいでない方は、このステップをスキップできます。
scraper.pyスクリプトをヘッドモードで実行します。これにより、quit()コマンドがChromeブラウザウィンドウを閉じる前に、Googleページを表示するChromeブラウザウィンドウが一時的に開きます。EU圏内にお住まいの場合は、次のように表示されます。
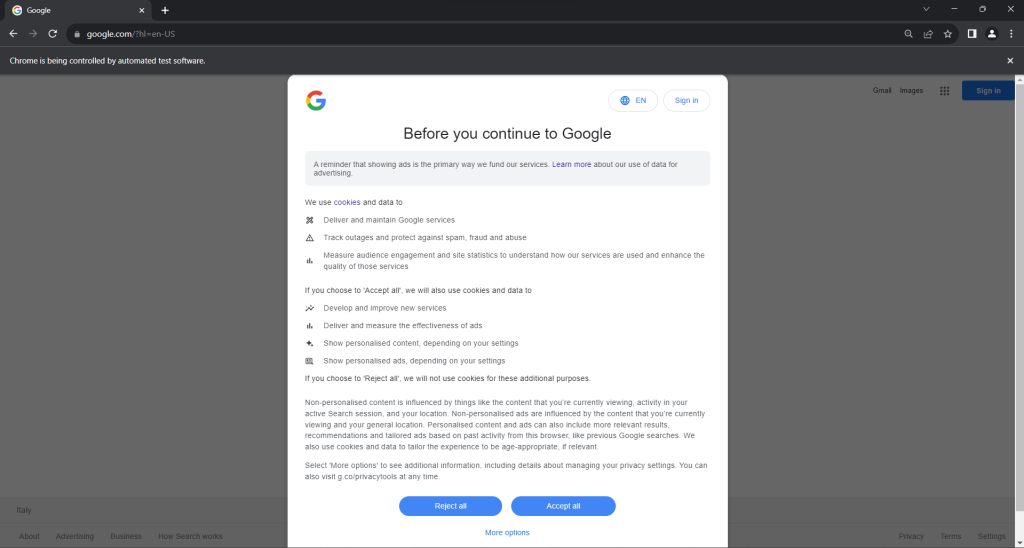
「Chromeは自動テストソフトウェアにより制御されています」というメッセージは、ChromeがSeleniumによって想定通りに制御されていることを確認するものです。
EU圏内のユーザーにはGDPRに基づくクッキーポリシーダイアログが表示されます。これに該当する場合、そのページを操作したいのであれば、この状況に対処する必要があります。該当しない場合は、ステップ5に進んでください。
Googleページをシークレットモードで開き、GDPRクッキーダイアログを確認してください。それを右クリックし、「検証」オプションを選択します。
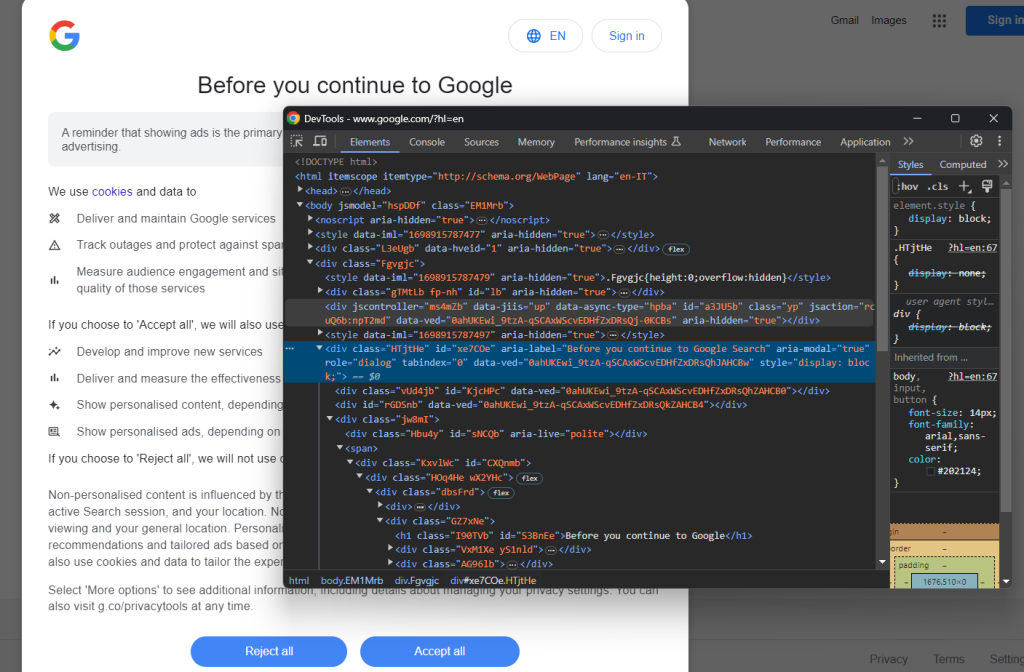
ダイアログのHTML要素は次の方法で検索できます。
cookie_dialog = driver.find_element(By.CSS_SELECTOR, "[role='dialog']")
find_element()は、さまざまな方法でページ上のHTML要素を検索するためにSeleniumが提供しているメソッドです。このケースではCSSセレクターを使用しました。
次のようにByをインポートすることをお忘れなく。
from selenium.webdriver.common.by import By
次に、「すべて承認」ボタンを見てみましょう。
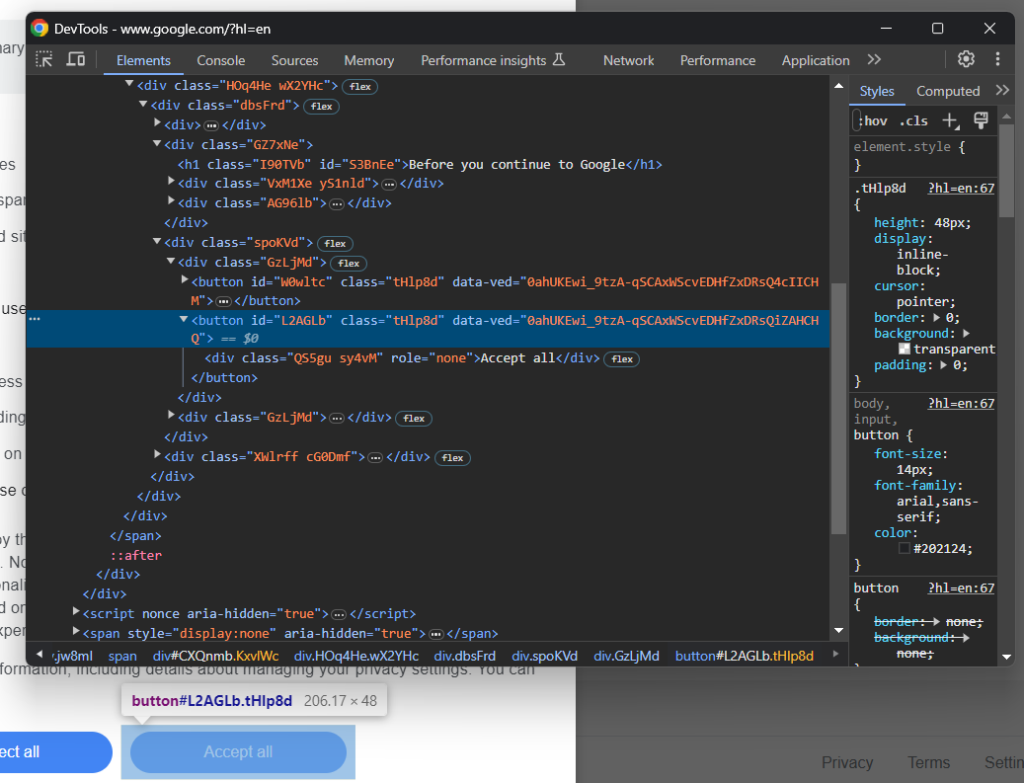
ご覧の通り、CSSクラスがランダムに生成されているように見えるため、それを簡単に選択する方法はありません。そのため、そのコンテンツを対象とするXPath式を使用して取得できます。
accept_button = cookie_dialog.find_element(By.XPATH, "//button[contains(., 'Accept')]")
この指示により、ダイアログ内の最初のボタンで、テキストに「Accept」という文字列が含まれているものが特定されます。詳細については、XPathとCSSセレクターに関するガイドをご覧ください。
以下は、オプションのGoogleクッキーダイアログを処理するにあたり、すべての要素がどう連携しているかを示しています。
try:
    # select the dialog and accept the cookie policy
    cookie_dialog = driver.find_element(By.CSS_SELECTOR, "[role='dialog']")
    accept_button = cookie_dialog.find_element(By.XPATH, "//button[contains(., 'Accept')]")
    if accept_button is not None:
        accept_button.click()
except NoSuchElementException:
    print("Cookie dialog not present")
click()命令により、「すべて承認」ボタンがクリックされてダイアログが閉じられ、ユーザーとの対話が許可されます。クッキーポリシーのダイアログボックスが表示されない場合は、代わりにNoSuchElementExceptionがスローされます。スクリプトはそれをキャッチして続行します。
NoSuchElementExceptionを忘れずにインポートしてください。
from selenium.common import NoSuchElementException
お疲れ様です!「関連する質問」セクションのあるページにアクセスする準備ができました。
ステップ5:検索フォームを送信する
ブラウザでGoogleホームページにアクセスし、検索フォームを確認します。それを右クリックし、「検証」オプションを選択します。
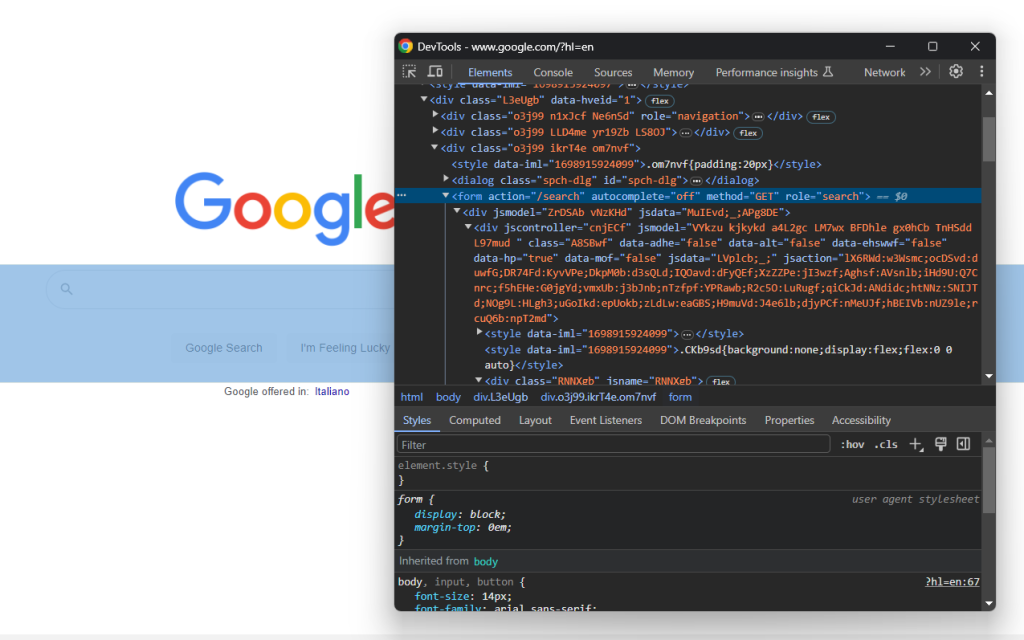
この要素にはCSSクラスはありませんが、そのaction属性から選択できます。
search_form = driver.find_element(By.CSS_SELECTOR, "form[action='/search']")
ステップ4をスキップした場合は、を使用してByをインポートします。
from selenium.webdriver.common.by import By
フォームのHTMLコードを展開して検索テキストエリアを確認します。
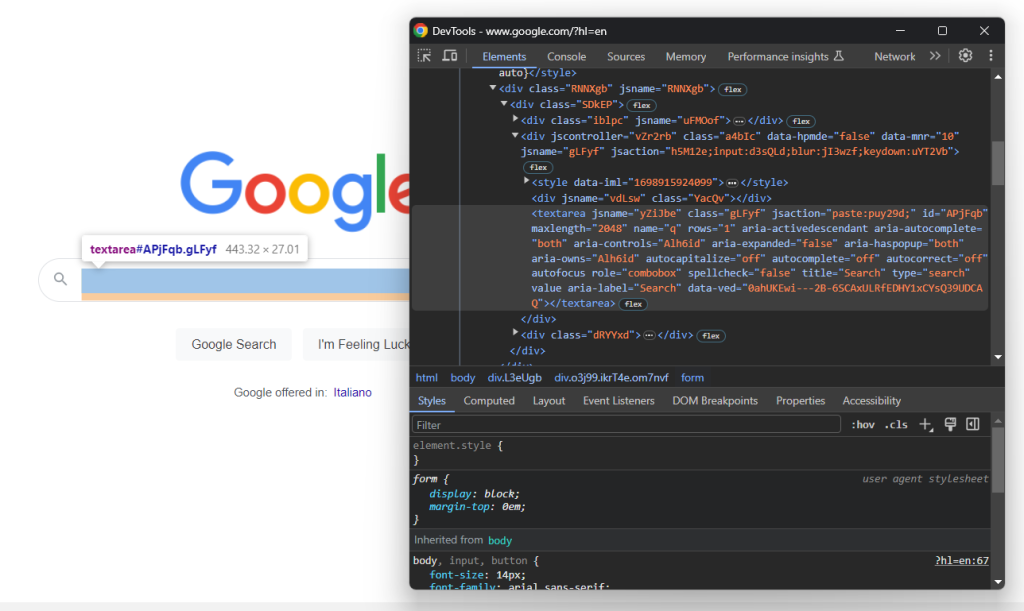
このノードのCSSクラスはランダムに生成されたようです。したがって、そのaria-label属性から選択します。次に、send_keys()メソッドを使用してターゲット検索クエリを入力します。
search_textarea = search_form.find_element(By.CSS_SELECTOR, "textarea[aria-label='Search']")
search_query = "Bright Data"
search_textarea.send_keys(search_query)
この例では、検索クエリは「Bright Data」ですが、それ以外の検索でも問題ありません。
フォームを送信してページを更新します。
search_form.submit()
素晴らしい!これで、制御されたブラウザが「関連する質問」セクションを含むGoogleページにリダイレクトされます。
スクリプトをヘッドモードで実行すると、ブラウザが閉じる前に次のように表示されるはずです。
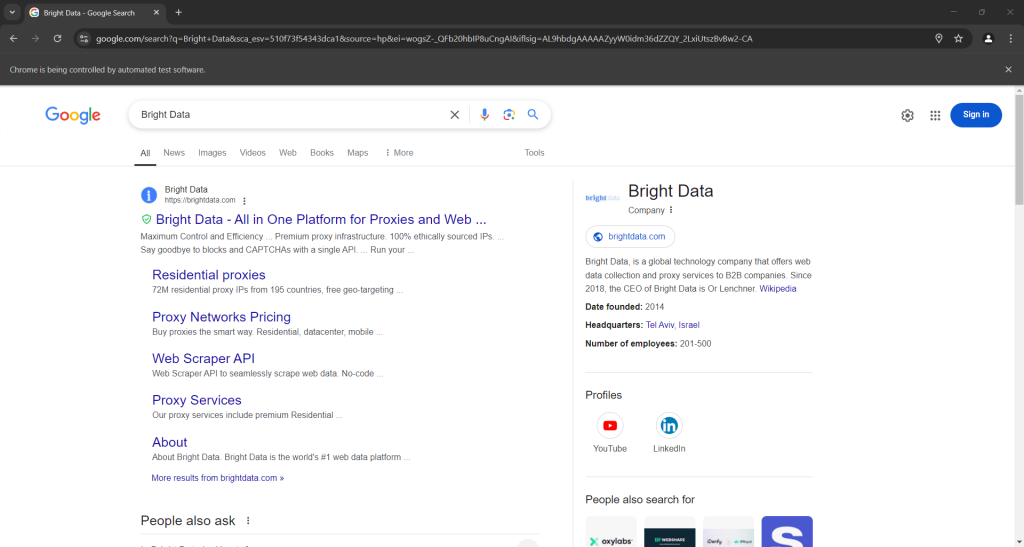
上のスクリーンショットの下部にある「関連する質問」セクションに注目してください。
ステップ6:「関連する質問」ノードを選択する
「関連する質問」のHTML要素を検証します。
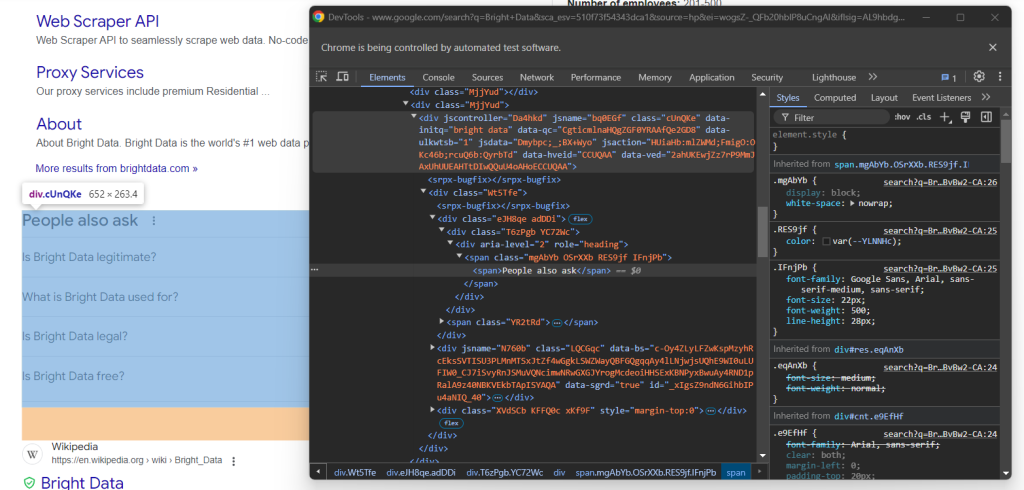
繰り返しになりますが、簡単に選択する方法はありません。今回すべきことは、「関連する質問」テキストを持つrole=headingを含むdiv要素を含んだjscontroller、jsname、jsaction属性がある
people_also_ask_div = WebDriverWait(driver, 5).until(
    EC.presence_of_element_located((
        By.XPATH, "//div[@jscontroller and @jsname and @jsaction][.//div[@role='heading' and contains(., 'People also ask')]]"
    ))
)
WebDriverWaitは特別なSeleniumクラスで、ページ上で特定の条件が満たされるまでスクリプトを一時停止します。上の例では、目的のHTML要素が表示されるまで最大5秒待機します。これは、フォームの送信後にページを完全に読み込むために必要です。
presence_of_element_locted()内で使われているXPath式は複雑ですが、「関連する質問」要素を選択するのに必要な基準を正確に記述しています。
必要なインポートを忘れずに追加してください。
from selenium.webdriver.support.wait import WebDriverWait
from selenium.webdriver.support import expected_conditions as EC
いよいよGoogleの「関連する質問」セクションからデータをスクレイピングします!
ステップ7:「関連する質問」をスクレイピングする
まずは、スクレイピングしたデータを保存するためのデータ構造を定義します。
people_also_ask_questions = []
「関連する質問」セクションにはいくつかの質問が含まれているため、これは配列である必要があります。
では、「関連する質問」ノードの最初の質問ドロップダウンを見てみましょう。
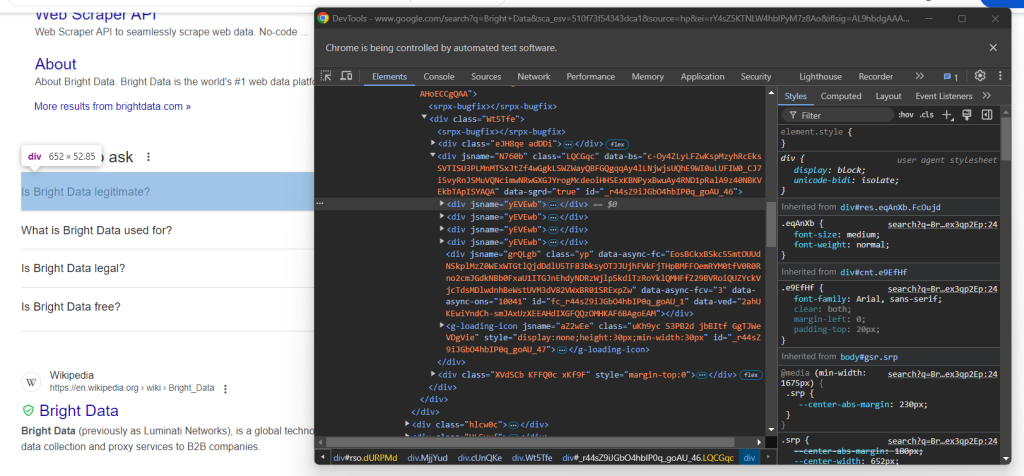
ここでは、jsname属性のみを持つ「関連する質問」要素内のdata-sgrd=”true”
次のロジックで質問ドロップダウンを選択します。
people_also_ask_inner_div = people_also_ask_div.find_element(By.CSS_SELECTOR, "[data-sgrd='true']")
people_also_ask_inner_div_children = people_also_ask_inner_div.find_elements(By.XPATH, "./*")
for child in people_also_ask_inner_div_children:
    # if the current element is a question dropdown
    if child.get_attribute("jsname") is not None and child.get_attribute("class") == '':
        # scraping logic...
要素をクリックして展開します。
child.click()
次に、質問要素内のコンテンツを見てみましょう。
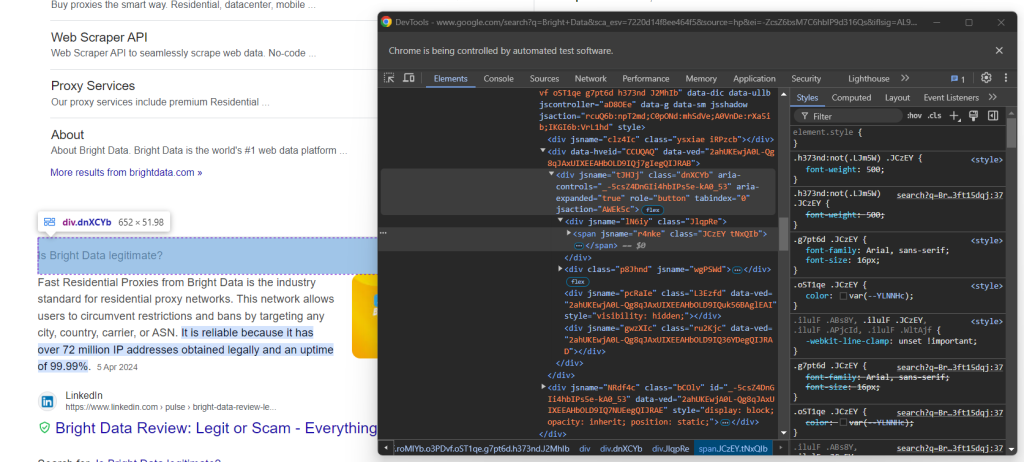
質問はaria-expanded=”true”ノード内のタグ内に含まれていることに注意してください。以下のようにスクレイピングします。
question_title_element = child.find_element(By.CSS_SELECTOR, "[aria-expanded='true'] span")
question_title = question_title_element.text
次に、回答要素を検証します。
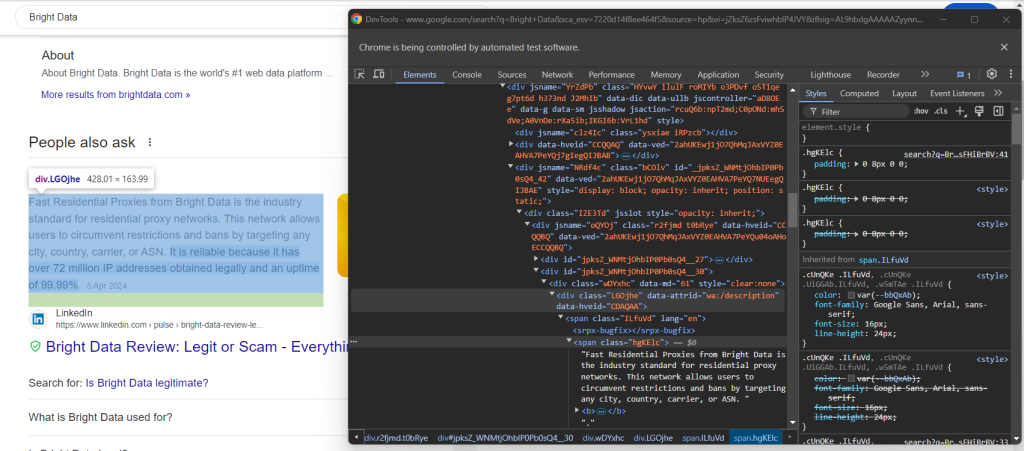
data-attrid=“wa:/description”要素内のlang属性を持つノードでテキストを収集して、それの取得方法を確認してください。
question_description_element = child.find_element(By.CSS_SELECTOR, "[data-attrid='wa:/description'] span[lang]")
question_description = question_description_element.text
次に、回答ボックスにあるオプション画像を検証します。
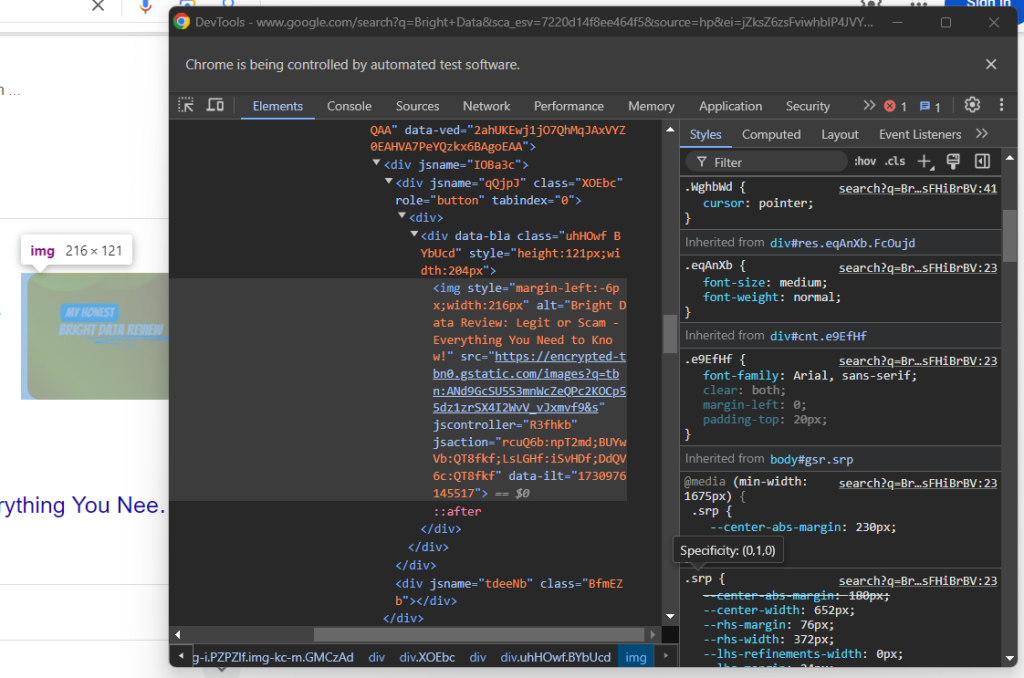
data-ilt属性を持つsrc属性にアクセスして、そのURLを取得できます。
try:
    question_image_element = child.find_element(By.CSS_SELECTOR, "img[data-ilt]")
    question_image = question_image_element.get_attribute("src")
except NoSuchElementException:
    question_image = None
画像要素はオプションなので、上記のコードをtry...exceptブロックで囲む必要があります。ノードが現在の質問に存在しない場合、find_element()はNoSuchElementExceptionを発生させます。コードはそれを検知して次に進みます。その場合は、
ステップ4をスキップした場合は、例外をインポートします。
from selenium.common import NoSuchElementException
最後に、ソースセクションを検証します。
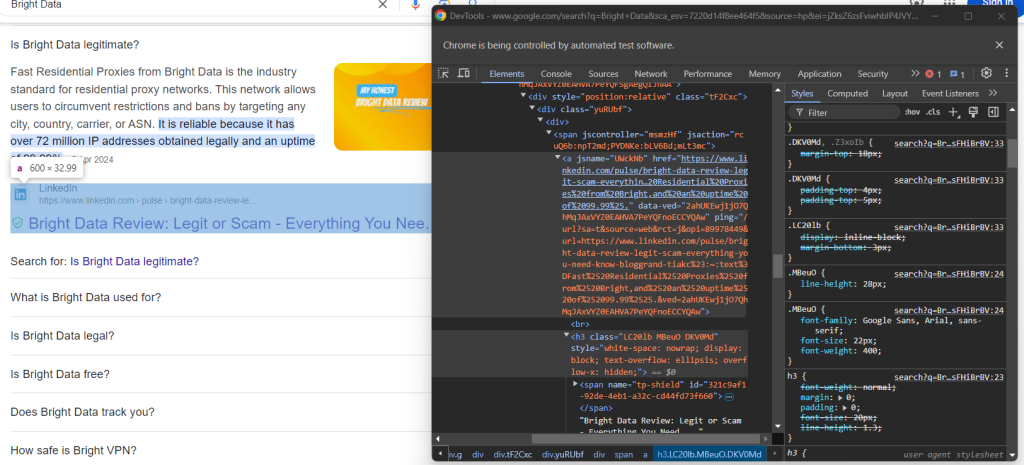
h3要素の親である要素を選択することで、ソースのURLを取得できます。
question_source_element = child.find_element(By.XPATH, ".//h3/ancestor::a")
question_source = question_source_element.get_attribute("href")
スクレイピングされたデータを使用して新しいオブジェクトを作成し、それをpeople_also_ask_questions配列に追加します。
people_also_ask_question = {
  "title": question_title,
  "description": question_description,
  "image": question_image,
  "source": question_source
}
people_also_ask_questions.append(people_also_ask_question)
その調子です!Googleページから「関連する」セクションをスクレイピングできました。
ステップ8:スクレイピングしたデータをCSVにエクスポートする
people_also_ask_questionsを指定すると、次の出力が表示されます。
[{'title': 'Is Bright Data legitimate?', 'description': 'Fast Residential Proxies from Bright Data is the industry standard for residential proxy networks. This network allows users to circumvent restrictions and bans by targeting any city, country, carrier, or ASN. It is reliable because it has 150 million+ IP addresses obtained legally and an uptime of 99.99%.', 'image': 'https://encrypted-tbn0.gstatic.com/images?q=tbn:ANd9GcSU5S3mnWcZeQPc2KOCp55dz1zrSX4I2WvV_vJxmvf9&s', 'source': 'https://www.linkedin.com/pulse/bright-data-review-legit-scam-everything-you-need-know-bloggrand-tiakc#:~:text=Fast%20Residential%20Proxies%20from%20Bright,and%20an%20uptime%20of%2099.99%25.'}, {'title': 'What is Bright Data used for?', 'description': "Bright Data is the world's #1 web data platform, supporting the public data needs of over 22,000 organizations in nearly every industry. Using our solutions, organizations research, monitor, and analyze web data to make better decisions.", 'image': None, 'source': "https://brightdata.com/about#:~:text=Bright%20Data%20is%20the%20world's,data%20to%20make%20better%20decisions."}, {'title': 'Is Bright Data legal?', 'description': "Bright Data's platform, technology, and network (collectively, “Services”) are meant for legitimate and legal purposes only and are subject to the Bright Data Master Service Agreement.", 'image': None, 'source': "https://brightdata.com/acceptable-use-policy#:~:text=Bright%20Data's%20platform%2C%20technology%2C%20and,Bright%20Data%20Master%20Service%20Agreement."}, {'title': 'Is Bright Data free?', 'description': 'Bright Data offers four free proxy solutions to meet various needs: Anonymous Proxies: These top-performing anonymous proxies let you access websites anonymously, routing traffic through a vast Residential IP Network of 150 million+ IPs, concealing your true location.', 'image': None, 'source': 'https://brightdata.com/solutions/free-proxies#:~:text=Bright%20Data%20offers%20four%20free,IPs%2C%20concealing%20your%20true%20location.'}]
これだけでも素晴らしいですが、他のチームメンバーと簡単に共有できる形式だったらもっと良いでしょう。そこで、 people_also_ask_questions をCSVファイルにエクスポートしましょう!
Python標準ライブラリからcsvパッケージをインポートします。
import csv
次に、これを使用して出力CSVファイルにSERPデータを入力します。
csv_file = "people_also_ask.csv"
header = ["title", "description", "image", "source"]
with open(csv_file, "w", newline="", encoding="utf-8") as csvfile:
    writer = csv.DictWriter(csvfile, fieldnames=header)
    writer.writeheader()
    writer.writerows(people_also_ask_questions)
ついに!「関連する質問」のスクレイピングスクリプトが完成しました。
ステップ9:仕上げ
最終的なscraper.pyスクリプトには次のコードが含まれているはずです。
from selenium import webdriver
from selenium.webdriver.chrome.service import Service
from selenium.webdriver.chrome.options import Options
from selenium.webdriver.common.by import By
from selenium.common import NoSuchElementException
from selenium.webdriver.support.ui import WebDriverWait
from selenium.webdriver.support import expected_conditions as EC
import csv

# to control a Chrome window in headless mode
options = Options()
options.add_argument("--headless") # comment it while developing

# initialize a web driver instance with the
# specified options
driver = webdriver.Chrome(
    service=Service(),
    options=options
)

# connect to the Google home page
driver.get("https://google.com/")

# deal with the optional Google cookie GDPR dialog
try:
    # select the dialog and accept the cookie policy
    cookie_dialog = driver.find_element(By.CSS_SELECTOR, "[role='dialog']")
    accept_button = cookie_dialog.find_element(By.XPATH, "//button[contains(., 'Accept')]")
    if accept_button is not None:
        accept_button.click()
except NoSuchElementException:
    print("Cookie dialog not present")

# select the search form
search_form = driver.find_element(By.CSS_SELECTOR, "form[action='/search']")

# select the textarea and fill it out
search_textarea = search_form.find_element(By.CSS_SELECTOR, "textarea[aria-label='Search']")
search_query = "Bright Data"
search_textarea.send_keys(search_query)

# submit the form to perform a Google search
search_form.submit()

# wait up to 5 seconds for the "People also ask" section
# to be on the page after page change
people_also_ask_div = WebDriverWait(driver, 5).until(
    EC.presence_of_element_located((
        By.XPATH, "//div[@jscontroller and @jsname and @jsaction][.//div[@role='heading' and contains(., 'People also ask')]]"
    ))
)

# where to store the scraped data
people_also_ask_questions = []

# select the question dropdowns and iterate over them
people_also_ask_inner_div = people_also_ask_div.find_element(By.CSS_SELECTOR, "[data-sgrd='true']")
people_also_ask_inner_div_children = people_also_ask_inner_div.find_elements(By.XPATH, "./*")
for child in people_also_ask_inner_div_children:
    # if the current element is a question dropdown
    if child.get_attribute("jsname") is not None and child.get_attribute("class") == '':
        # expand the element
        child.click()

        # scraping logic
        question_title_element = child.find_element(By.CSS_SELECTOR, "[aria-expanded='true'] span")
        question_title = question_title_element.text

        question_description_element = child.find_element(By.CSS_SELECTOR, "[data-attrid='wa:/description'] span[lang]")
        question_description = question_description_element.text

        try:
            question_image_element = child.find_element(By.CSS_SELECTOR, "img[data-ilt]")
            question_image = question_image_element.get_attribute("src")
        except NoSuchElementException:
            question_image = None

        question_source_element = child.find_element(By.XPATH, ".//h3/ancestor::a")
        question_source = question_source_element.get_attribute("href")

        # populate the array with the scraped data
        people_also_ask_question = {
          "title": question_title,
          "description": question_description,
          "image": question_image,
          "source": question_source
        }
        people_also_ask_questions.append(people_also_ask_question)

# export the scraped data to a CSV file
csv_file = "people_also_ask.csv"
header = ["title", "description", "image", "source"]
with open(csv_file, "w", newline="", encoding="utf-8") as csvfile:
    writer = csv.DictWriter(csvfile, fieldnames=header)
    writer.writeheader()
    writer.writerows(people_also_ask_questions)

# close the browser and free up the resources
driver.quit()
100行のコードで、PAAスクレイパーを構築できました!
実行して正しく動作することを確認してください。Windowsでは、以下のコマンドでスクレイパーを起動します。
python scraper.py
LinuxまたはmacOSでは以下を実行してください。
python3 scraper.py
スクレイパーの実行が終了するのを待ちます。すると、プロジェクトのルートディレクトリにpeople_also_ask.csvファイルが表示されます。開くと、次の内容が表示されます。
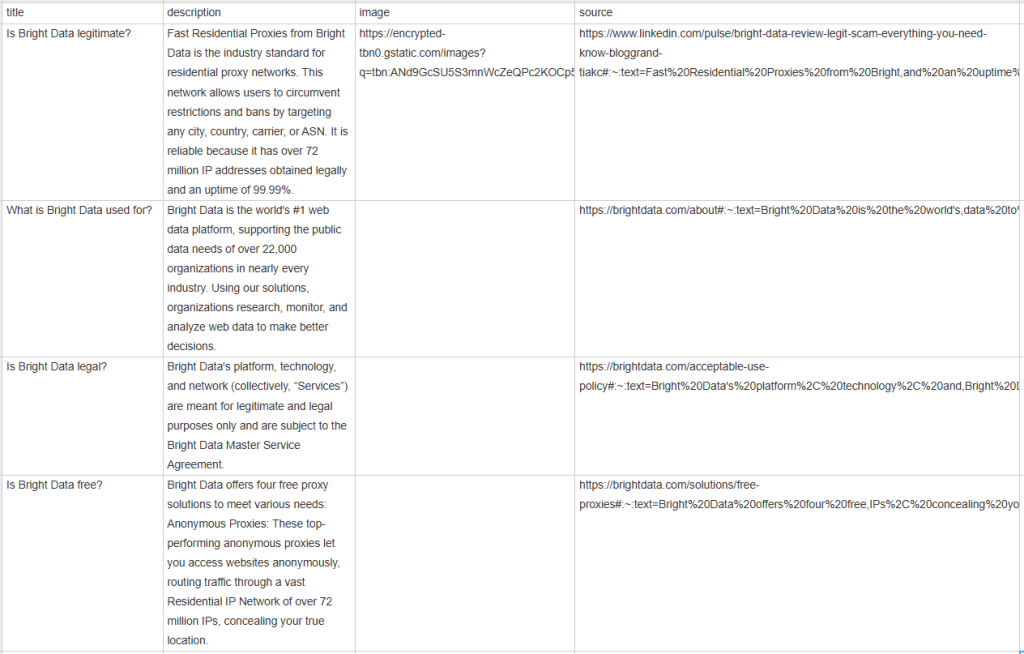
おめでとうございます、ミッション完了です!
まとめ
このチュートリアルでは、Googleページの「関連する質問」セクションとは何か、そこに含まれるデータについて、そしてPythonを使用してそのセクションをスクレイピングする方法を学びました。ここで学んだように、データを自動的に取得するシンプルなスクリプトを構築するには、Pythonコードを数行書くだけで済みます。
ここで提示されたソリューションは小規模なプロジェクトではうまく機能しますが、大規模なスクレイピングには実用的ではありません。問題は、Googleが業界で最も先進的なアンチボット技術を複数有していることです。そのため、CAPTCHAやIP禁止によってブロックされる可能性があります。さらに、このプロセスを複数のページにまたがって拡張すると、インフラストラクチャのコストが増加します。
それまつまり、Googleを効率的かつ確実にスクレイピングすることは不可能だということでしょうか?そんなことはありません!必要なのは、これらの課題に対処できる、Bright DataのGoogle検索APIなどの高度なソリューションだけです。
Google検索APIには、「関連する質問」セクションを含むGoogle SERPページからデータを取得するためのエンドポイントが用意されています。簡単なAPI呼び出しで、必要なデータをJSONまたはHTML形式で取得できます。使用を開始する方法については、公式ドキュメントをご参照ください。
今すぐサインアップして無料トライアルを始めましょう!


